ANDROID TASK:
Create new Android application which would allow the user to input some text, and then transfer this text to a separate TextView by clicking on it.
SOLUTION:
In this sample we are going to create a basic Android application using the official SDK, Android Studio (the installation of which also requires Java SDK being installed). Once Android Studio is installed and started, you will need to start a new Android Studio project.
First of all, you will be required to fill the “Application name” and “Company Domain” fields (in our case as “Sample_01” and “mycompany”), as well as choose the location to store your project.
The next window called “Target Android Devices” requires you to select the form factors your application is going to run on. We are going to proceed with default selection “Phone and Tablet”.
The selection of Android API version may be a bit tricky, as higher level versions have more features but are available to fewer devices (and vice versa, lower API levels target more devices but have fewer features available). In our case we will select API 19: Android 4.4 (KitKat), since it covers around 70% of devices.
The next window called “Add an Activity” allows you to select an pre-set activity type to be added to your application. We are going to select “Blank Activity”.
The next window called “Customize the Activity” prompts us for Activity Name (we will use “SampleActivity1” name), as well as Layout Name, Title, and Menu Resource (we will leave automatically suggested names for these, which are “activity_sample1”, “SampleActivity1”, and “menu_sample_activity1”).
After this you can finally click on “Finish” button.
We now can see the files of project under the Project panel (which can be viewed in different modes, Android view being the default one). Let’s switch Project panel to Project view, and take a look at some project files:
“app/src/main/res/layout/activity_sample1.xml”
-XML layout file used for previewing and editing interface elements. You can see some of the elements being already in place by default, they were added since we selected “Blank Activity” rather than “No Activity”.
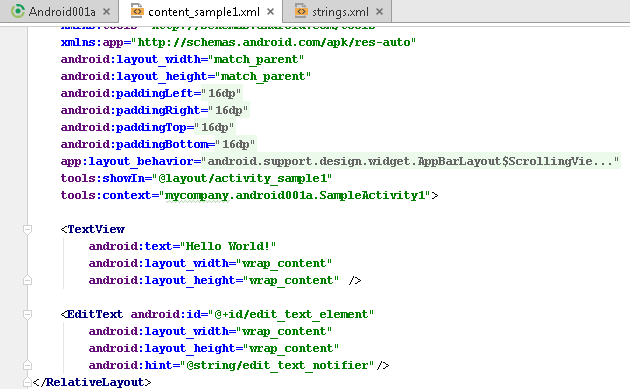
“app/src/main/res/layout/content_sample1.xml”
-Another XML layout file, which contains, among some other settings, a TextView element which is used to display “Hello World!” message (again, part of the default pack).
“app/src/main/java/mycompany.android001a/SampleActivity1.java”
-This file is used to store Java code for the default activity, which is used to load the aforementioned ‘Hello World!” message.
“app/build.gradle”
-Gradle is used by Android Studio to compile and build the application, therefore each part of project (as well as project itself as a whole) has an appropriate “build.gradle” file. The main point of interest for us is the configuration data stored in these files, which can be modified in order to change SDK version used and other parameters.
To run the application in its current state, select Run->Run app in the main menu (alternatively, click on “Run app” icon (green triangle), or press Shift+F10).
You will be asked to choose the device to run your application at (these may include real Android devices connected to your PC, or emulated Android devices).
In case you decide to use a real Android device connected to your PC, it may be not visible untile Developer mode/USB Debugging is turned on in its settings, and the PC itself may
need ADB driver installed.
In case you decide to use virtual Android device (Android emulator), you will need to choose “Launch emulator” option. You can create/edit/configure Android Virtual Devices (AVDs)
in Tools->Android->AVD manager.
Now the basic application can be seen running on Android (in our case Android emulator), showing the message “Hello World!”:
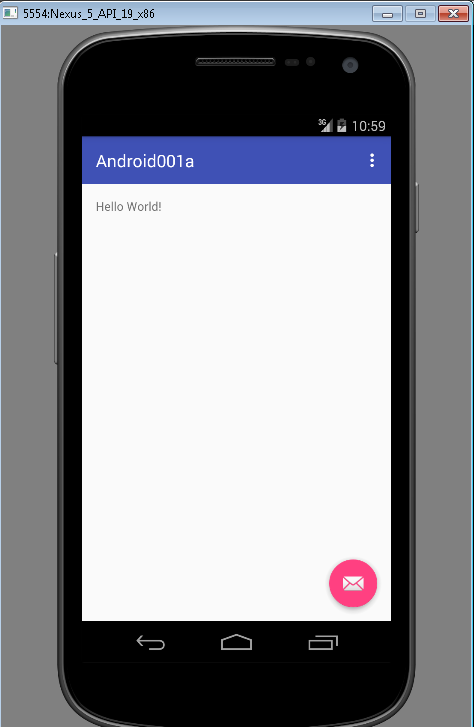
This application also has the basic action (pink icon) which shows the “Replace with your own action” message on click. Finally, the menu icon on the blue bar above will show “Settings” tab on click, but it is also has no further functionality.
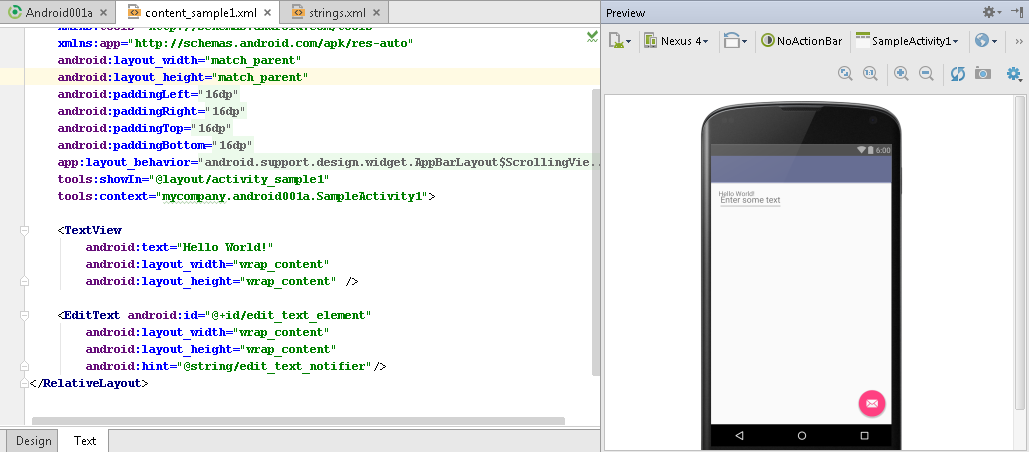
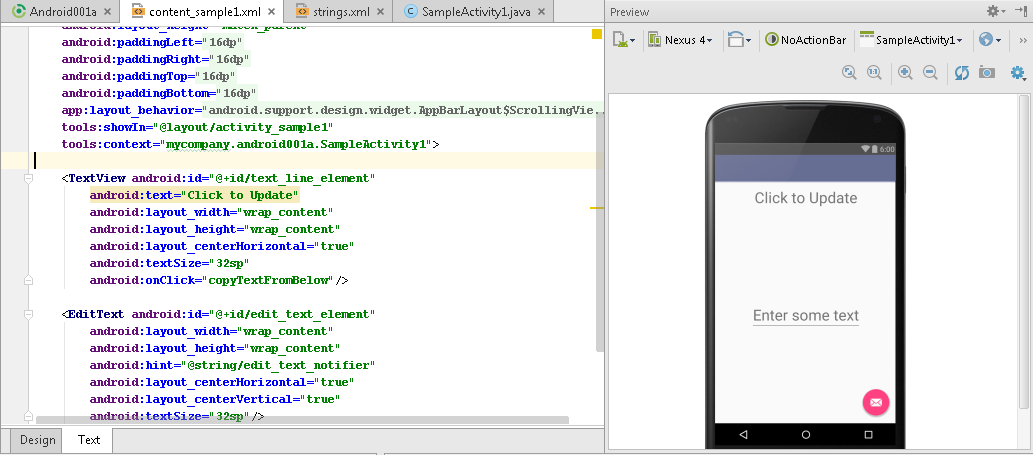
Time to add new functionality to this application, such as an editable text field. For this, you will need to access the “app/src/main/res/layout/content_sample1.xml” file. It will be opened in the Preview Pane. In the ComponentTree menu to the right from the preview, you can see the components, namely the “RelativeLayout” (which is our root view), and branching from it is TextView “Hello World!” (which is the child view).
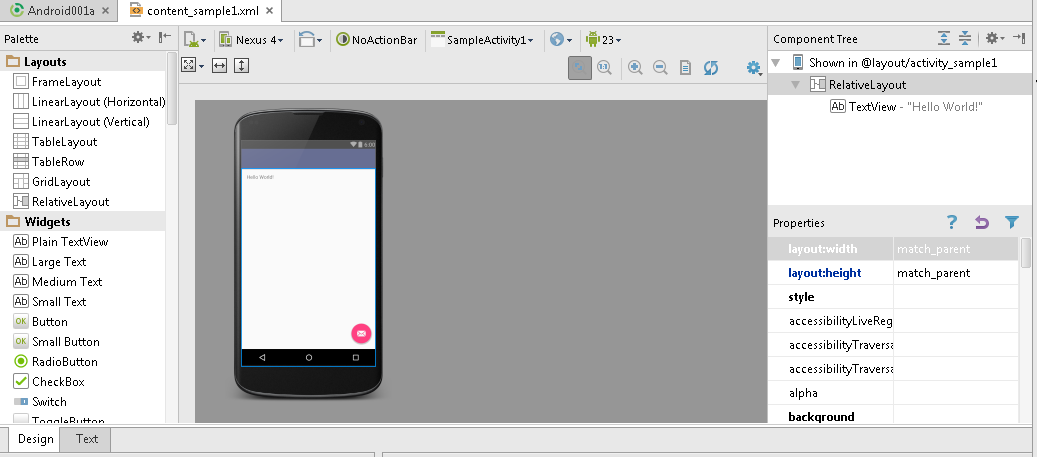
Preview Pane has two modes shown as tabs below it: Design (graphical element-based) and Text (XML-based). By clicking on Text tab, you will switch it to XML mode.
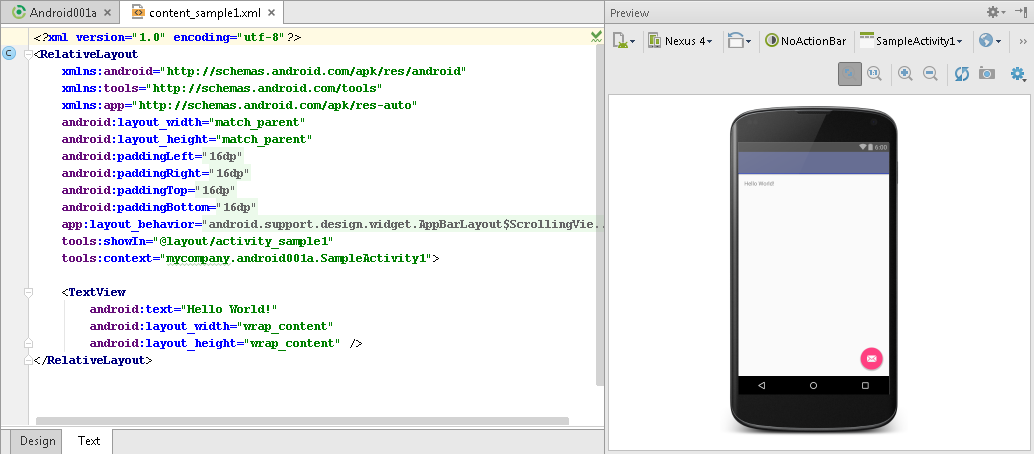
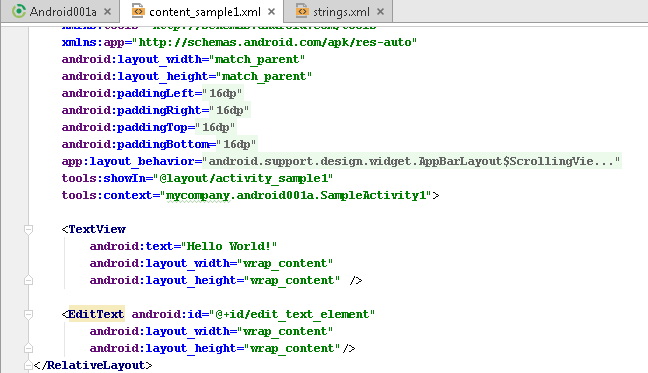
There, underneath the section you can add a new section. You will be prompted to input width and height of this new element, and the final result should look like this:
We can also add unique identifier to this new element:
In this case “@” symbol denotes that we refer to a resource object, “+” symbol means that this resource is defined for the first time, and the “edit_text_element” is the name of the resource.
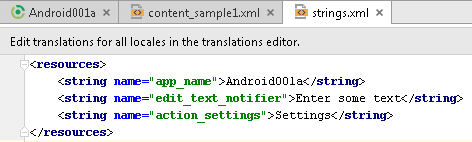
Next, access the “app/src/main/res/values/strings.xml” file. This is a file containing the strings we can use as resources. By default it contains only two strings:
By doing so, a new string resource was created, which we can now use in “content_sample1.xml”
Let us add a new parameter to EditText using this string:
android:hint=”@string/edit_text_notifier”
This hint will be shown in EditText element before user enters any text. Notice how this is immediately reflected on the Preview Pane
We can enlarge and re-position the TextView and EditText elements by adding:
android:layout_centerHorizontal=”true”
android:textSize=”32sp”
to both elements, and additionally:
android:layout_centerVertical=”true”
to EditText element (to set EditText and TextView them apart visually).
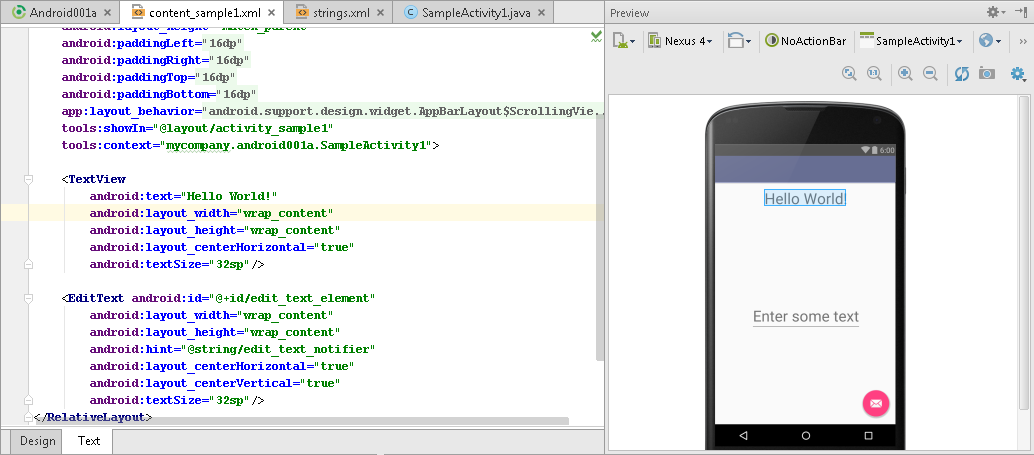
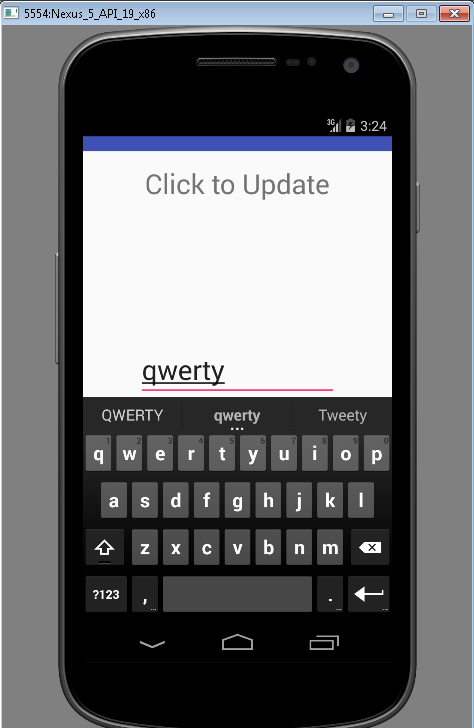
Now let’s update TextView element.We will change “Hello World!” text to “Click to Update”:
android:text=”Click to Update”
We will add onClick method named “copyTextFromBelow”:
android:onClick=”copyTextFromBelow”
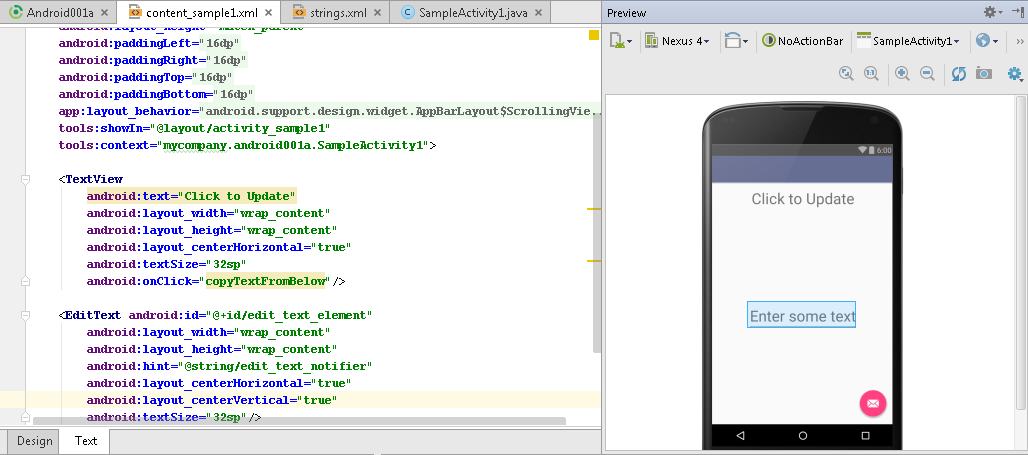
Finally will add an identifier “text_line_element” to this element
android:id=”@+id/text_line_element”
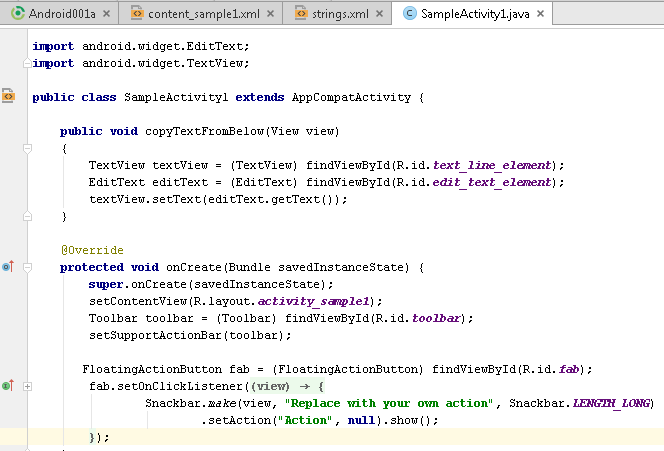
But now we need to actually define a method with such name. For this, access the “app/src/main/java/mycompany.android001a/SampleActivity1.java” file. It contains SampleActivity1 class, within which we will create the “copyTextFromBelow” method:
public void copyTextFromBelow(View view)
{
TextView textView = (TextView) findViewById(R.id.text_line_element);
EditText editText = (EditText) findViewById(R.id.edit_text.element);
textView.setText(editText.getText());
}
First of all, such view types as “TextView” and “EditText” will not be recognized unless they are imported. For this, we will need to add the following lines above the class:
import android.widget.EditText;
import android.widget.TextView;
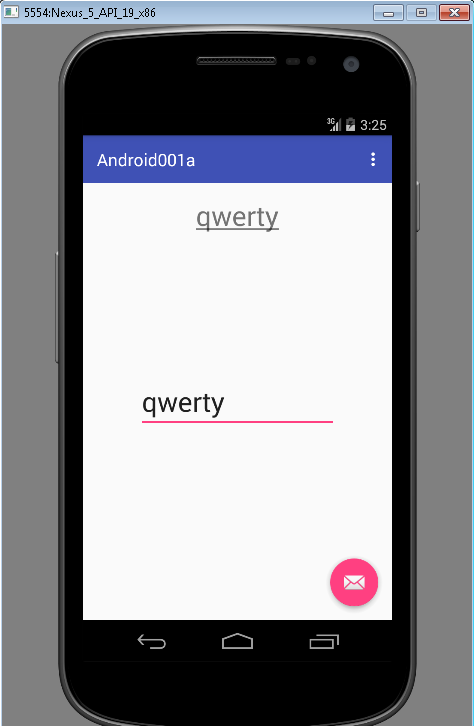
To explain the method itself, textView and editText are the in-method representations of views with ids “text_line_element” and “edit_text_element” respectively. We are using findViewById method to detect them. Afterwards getText() and setText() methods are used to apply text from one element to another.
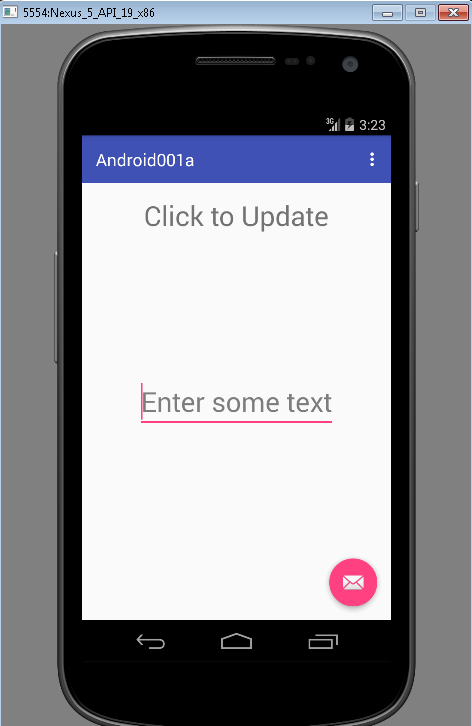
Result of running the application (as shown through Android Virtual Device):
TROUBLESHOOTING:
Below are some of the links with solutions to problems most likely to appear during the Android Studio installation and attempts to build/run the application. Note that using Clean Project option each time after a new build was done, and killing adb.exe processes if there are too many of them may reduce some of the otherwise recurring errors.
Problem: Error mentioning Intel x86 Emulation Accelerator (HAXM installer) being not installed, hardware acceleration needed, and HAX kernel module not instaled.
Solution: Go to Tools->Android->SDK Manager and select “Intel x86 Emulation Accelerator (HAXM installer)” from SDK Tools list. After clicking “Apply” it should be installed. Next go to the folder mentioned in error message (the path shown usually looks like “C:\Users\User\AppData\Local\Android\sdk\”). From there enter the following folders: “extras\intel\Hardware_Accelerated_Execution_Manager\” and run intelhaxm-android.exe.
In case the installer shows a problem message, such as “This computer does not support Intel Virtualization Technology (VT-X)” – when in fact your processor supports it – you should make sure that you have it enabled in BIOS (mind that some BIOS manufacturers do not include this option in the BIOS, but instead require additional software to be downloaded to access more options). If you are sure that it is enabled yet the error persists, you should go to Control Panel -> Programs & Features -> “Turn Windows features on or off”, and make sure the “Hyper-V” checkbox is unchecked. Some antiviruses (such as Avast) also make use of Hardware-Assisted Virtualization, so you may need to disable it in antivirus as well for the installation to proceed.
Problem: New project creation is stuck on “Gradle: resolve dependencies”.
Solution: Make sure that your firewall (Windows Defender, or the one provided by your antivirus) allows Android Studio and Java to access the Internet. Another (although less likely) reason for this problem may be that the repository node Android Studio attempts to connect to is currently down.
Problem: Android Studio uses up too much memory, which may result in slowdown, Windows attempting to shut down Android Studio, errors such as “Cannot Set up guest memory ‘pc.ram’ : invalid Argument Error accepting connection, aborting” and so on…
Solutions:
http://stackoverflow.com/questions/27176353/android-studio-takes-too-much-memory
http://stackoverflow.com/questions/32883785/why-does-android-emulator-increase-the-ram-size-automatically-and-make-me-fail-t
These can be narrowed down to:
Tip 1: decreasing JVM’s max heap size in vmoptions file located at C:/Program Files/Android/Android Studio/bin/ (for 64-bit studio that would be studio64.exe.vmoptions) to something around Xmx512m
Tip 2: decreasing Gradle max heap size (no longer possible via options, but must be done on per-project basis by editing the gradle.properties file of your project), to the values around Xmx256m and XX:MaxPermSize=256m
Tip 3: decreasing Build Process Heap Size located at File->Other Settings->Default Settings->Build, Execution, Deployment->Compiler. It can be changed to something around 512 MB.
Tip 4: decreasing DEX Compiler Heap Size located at File->Other Settings->Default Settings->Build, Execution, Deployment->Compiler->Android Compiler. It can be changed to something around 400 MB.
Tip 5: downgrading Android Virtual Device properties. First and foremost, changing API for the latest one to the one “Marshmallow”/23 to the one which is sufficient for our application: KitKat/19. Nexus model with smaller than default screen can be selected, and unneeded features (such as camera emulation) can be turned off. RAM and VM heap values for Android Virtual Device can be also downgraded to, for example, 343 MB for RAM, and 64 MB for VM heap.
Tip 6: Turning VCM off and using another application to handle it instead.
Problem: “The following classes could not be instantiated: – android.support.design.widget.FloatingActionButton“
Solution:
http://stackoverflow.com/questions/35675855/android-studio-floatingactionbutton-error
(Gradle version must be edited and reverted to a stable one in case the most recent one is buggy)
Problem: “Error:Execution failed for task ‘:app:transformClassesWithDexForDebug’. …
… java.exe” finished with non-zero exit value 2”
Solution:
http://stackoverflow.com/questions/32889059/android-studio-1-4-and-vector-image/32889565#32889565
(multiDexEnabled must be set to true in defaultConfig section of build.gradle)
Help with Android Assignments
This is one of our Android development examples that was written by one of our experts. You can also read one more Android Development Sample posted on our blog.
If you have difficulties with your IT projects, or just don’t understand some issues, you can contact us any time and get qualified help with assignments.
By receiving Android assignment help from us, you will get an opportinuty to choose the expert to work with, to communicate with them in a live chat and pay for the assignment parts, when you are fully satisfied with them. Sounds terrific? We know. Hurry up to get our help.