Adobe Illustrator is frequently used by artists and graphic designers for creating vector images. If you need to create illustrations, diagrams, graphs, logos – all these and more can be created with the help of this program. In the following guide our expert shares how to use the basic tools: Brush Tool and Pathfinder in Adobe Illustrator. At first glance, it seems that the program is too complex, and it will take months to learn how to use it. But if you will put even a little effort in learning basic functions, you will see that using Illustrator is easy.
We know that some assignments are boring and seem pointless to you. For the cases when you have no time, desire, or knowledge to complete the assignment, you can use assignment help and get your homework done with a mouse click. We are proud of our team of experts: they are always ready to provide high-quality assistance with assignments on any discipline. Be sure that your assignment will be attentively completed by the given deadline. Everything is simple: place an order, pick the most suitable expert in your discipline, interact with the writer via online chat, and get a finished paper written as instructed.
How to Use Brush Tool and Pathfinder in Adobe Illustrator
Task: using Adobe Illustrator, learn how to use Brush Tool and Pathfinder Tool.
Solution:
The Pathfinder Tool is one of the most useful tools for manipulating paths. It has four shape modes and six pathfinder modes. You can find this function from Window > Pathfinder.
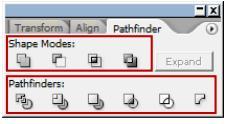 Figure 1. Pathfinder Tool
But first, let’s explore four shape modes:
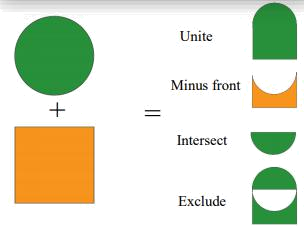 Figure 2. Shape Modes
Second, let’s understand six Pathfinder modes:
 Figure 3. Pathfinder Modes
Brushes make the appearance of paths stylish. They have many options to get effects. The above figure demonstrates these options. This lab introduces creating strokes with a natural brush to accentuate buildings and paths.
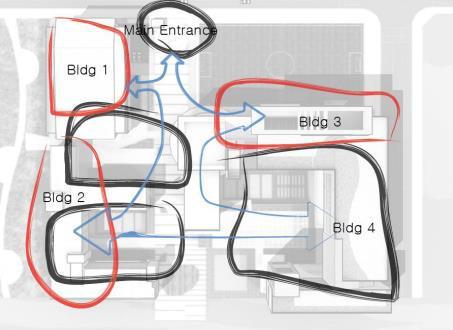 Figure 5. Brush Tool
1. Go to File > New, and then set up your domain size as width: 8cm and height: 6cm. Color mode is CMYK.
2. Find any photo on which you can practice. Then go to File > Place to add the photo. Do not check in the Link to involve the photo in your domain.
3. Let’s set Opacity as 30%. This function relates to the degree of transparency. To set this value, select your image and then change its opacity. Its function is on the toolbar, or go to Window > Transparency.
4. Let’s set Layers (Figure 6). Go to Window > Layers. It brings up the Layer Panel. Double-click the default name, Layer 1. Layer options will appear, and then change the name to Background. From this point, your photo is under the layer called Background.
Click the B. Lock button. After activating the lock button, you cannot modify the image.
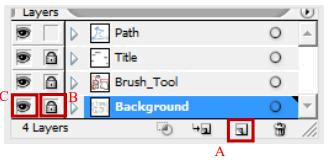 Figure 6. Layers
5. Click A. Create New Layer on the bottom of the layer panel. Then another layer called Layer 2 appears. Double-click the default name, and then change the name to Brush Tool.
6. Select Paint Brush Tool. The Fill is in white, and the Stroke is in black.
7. With the Paint Brush Tool, draw rectangles on open spaces (Figure 8). Do not worry about the line style. Keep in mind that these rectangles should be in the Layer Brush Tool.
8. Go to Select > All. After that, run the Brushes Tool (Window > Brushes). Click the pop up button and then go to Open Brush Library > Artistic > Artistic Ink (Figure 7). Select Dry Ink 1.
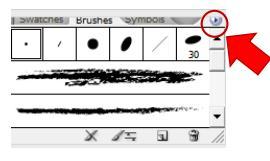 Figure 7. Brush Tool
9. To modify the width of lines, go to Window > Stroke. Set the value of weight as 0.2. Your result should look like Figure 8.
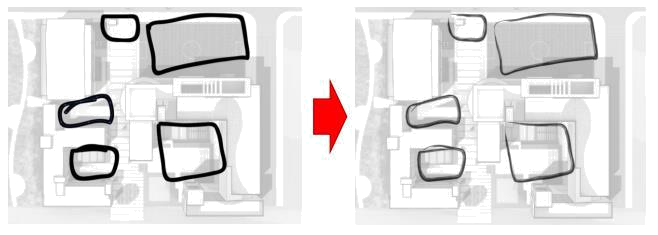 Figure 8. Brush Tool and open space
10. Draw other rectangles on the buildings by Dry Ink 1, and then change their color to red. Figure 5 gives you some idea about it.
11. Type each building’s name on the roofs by the Type Tool. You can easily change their font and size such as in MS Word.
12. According to Figure 5, draw moving paths. You can use Pen Tool and Convert Anchor Point Tool. In addition, Pen Tool allows you to draw an arrow head. To merge lines and arrow heads, use the Pathfinder Tool.
13. After that, change the line color to blue.